Hardness Test for Polymers

Hardness Test for Polymers
Introduction
Hardness measurement is one of the main and most common tests of mechanical and physical properties of materials. Hardness is defined as the resistance of a material against the penetration and indentation of a harder solid object. In fact, hardness is the resistance against creating permanent dents on the surface of the material and changing the shape of the surface.
According to the definition of hardness, standard test methods have been defined to measure the amount of hardness. According to Figure 1, in these test methods, a hard penetrative object is pressed to the test sample. With the applied pressure, a three-way stress (tensile, compressive and shear) causes a change in the shape of the surface and the sample. This test is very common and used widely because of its simplicity. Due to the non-destructive nature of these tests, it is possible to measure the hardness of small components and thin layers. In Figure 2, a test equipment can be seen.
Types of standard hardness test methods
Different types of hardness test methods are based on the different geometry of the indenter. The most common methods are: 1- Brinell hardness (sphere) 2- Rockwell hardness (cone and sphere) 3- Durometer Shore hardness
Among the methods mentioned above, Shore Durometer hardness test is more popular, which will be comprehensively discussed in the following.
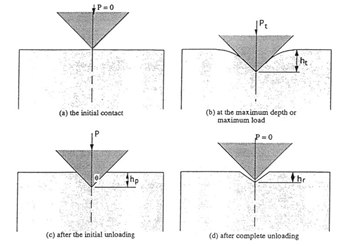 Fig 1. Mechanism of hardness test
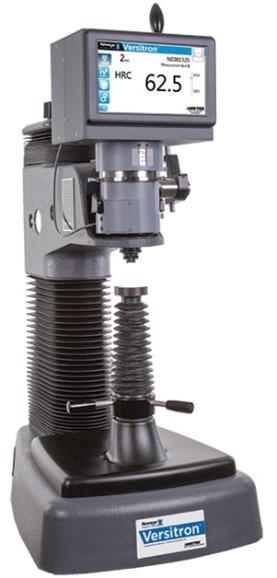 Fig 2. Equipment’s of hardness test
Brinell hardness (sphere)
The Brinell hardness test consists of a penetrating object with a diameter of 10 mm (in the shape of a sphere) which is made of steel or carbide, which can be seen in Figure 3, which can apply a load of up to 3000 kg to the sample. For soft materials, this load is reduced to 1500 and 500 kg.
From 10 to 30 seconds, the sample is subjected to penetrating load. This test method is classified according to ISO 6506 and BS 240:1986. The Brinell hardness number is calculated from the following equation:

HB = Brinell hardness number
F = load in Kg
D = ball indicator (mm)
d = impression diameter of indentation (mm)
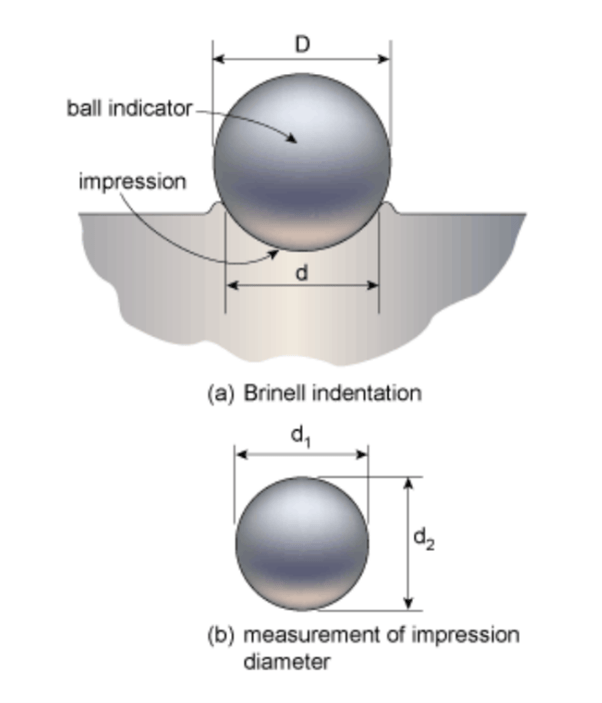 Fig 3. Mechanism of Brinell hardness test
Rockwell Hardness
The Rockwell hardness test includes of a cone-shaped indenter with diamond or steel material.
At first, the initial F0 force is applied by the penetrator for 10 seconds and the amount of penetration is h1. Then, F1 force will be applied for 15 seconds which is h2. According to Figure 4, the Rockwell hardness is calculated. The standard of Rockwell hardness test method is ISO 2039-2. This test is mainly used for hard plastics where the elasticity or creep of the polymer has little effect on the test result, such as polycarbonate, nylon, polystyrene and acetal.
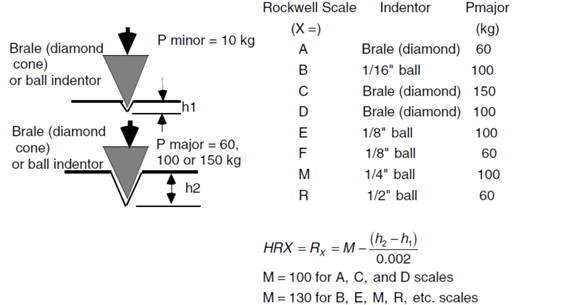 Fig 4. Mechanism and calculation of Rockwell hardness test
Shore Durometer Hardness
Perhaps the most popular and common method of measuring the hardness of materials is the Shore Durometer method, which is divided into two different types. Shore A, which is a needle in the shape of an incomplete cone, and Shore D, which is a needle in the shape of a cone with a spherical tip, which can be seen in Figure 5. This test can be performed according to ASTM D2240 or ISO 868 standards.
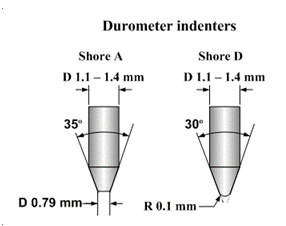 Fig 5. Shore A and Shore D
In both cases, the force is applied by a weight and a spring, and the indentation depth is a measure of hardness. One of the benefits of the Shore method is the portability of the test equipment due to its small size.
Shore A is used to determine the hardness of soft rubbers and very soft plastics, such as softened PVC. In this method, the incomplete conical needle has an angle of 35 degrees and the diameter of the smooth surface is 0.79 mm, which is calculated according to the equation below:

Where: F = Load (mN)
Ha = amount of hardness
Shore D is used for hard rubbers and thermoplastics such as PTFE. The placement angle of the needle in this method is 30 degrees with a spherical radius of 0.1 mm, its hardness is calculated from the following formula:

Table 1- shows a summary of hardness test methods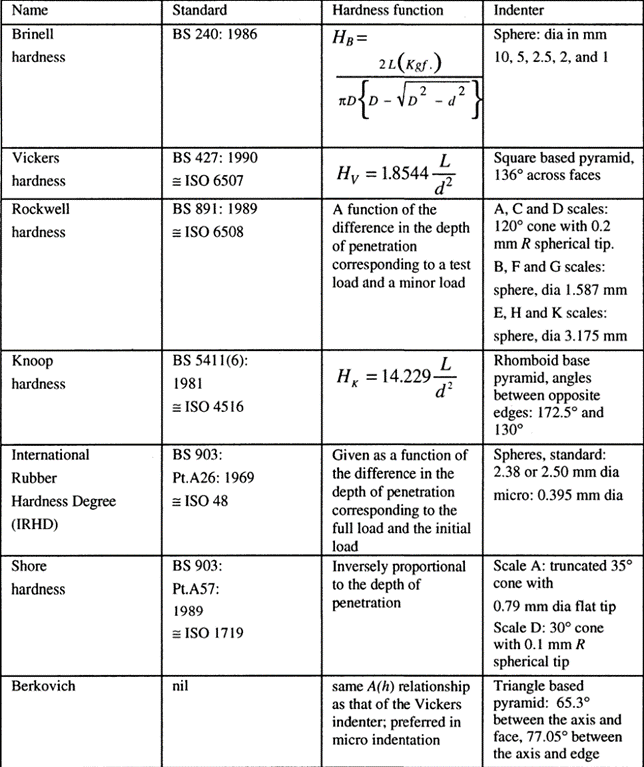
Comparison of hardness of polymers
- Table 2 provides a comparison of Rowell and Shore hardness for several different polymer types.
- Figure 6 shows the range of hardness in rubber and plastic materials.
- Figure 7 shows the range of hardness of polymers.
- In table 3 the application of Shore A and Shore D hardness test for different materials with different angles can be seen.
- Figure 9 shows the amount of hardness of devices made of plastic.
Table 2- Comparison of Rockwell and Shore hardness for several different types of polymers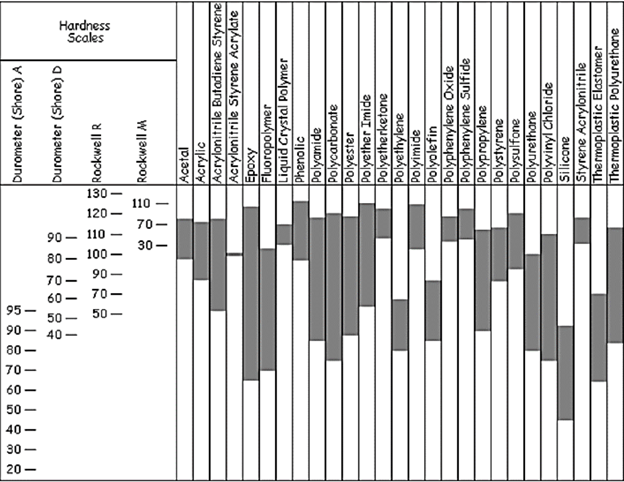
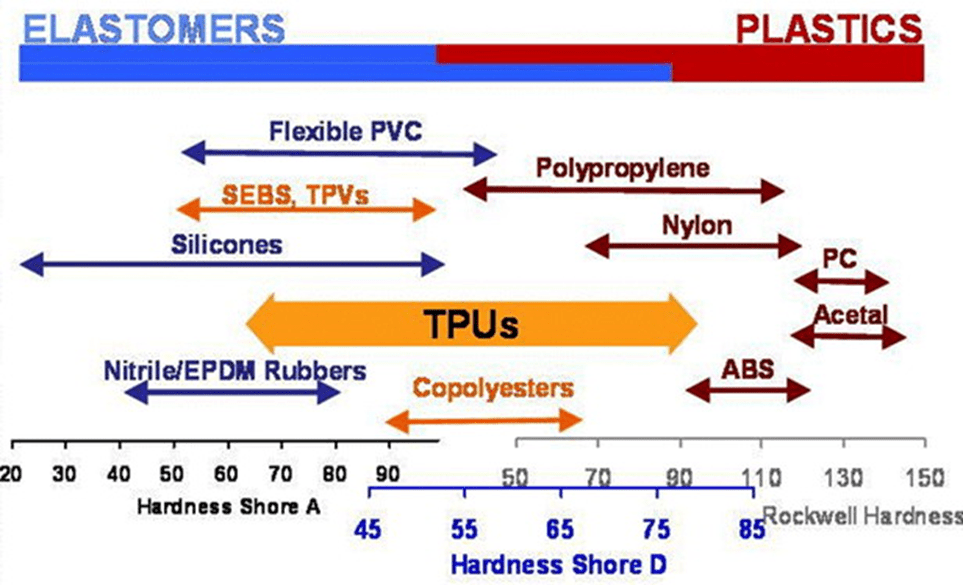 Fig 6. The range of hardness
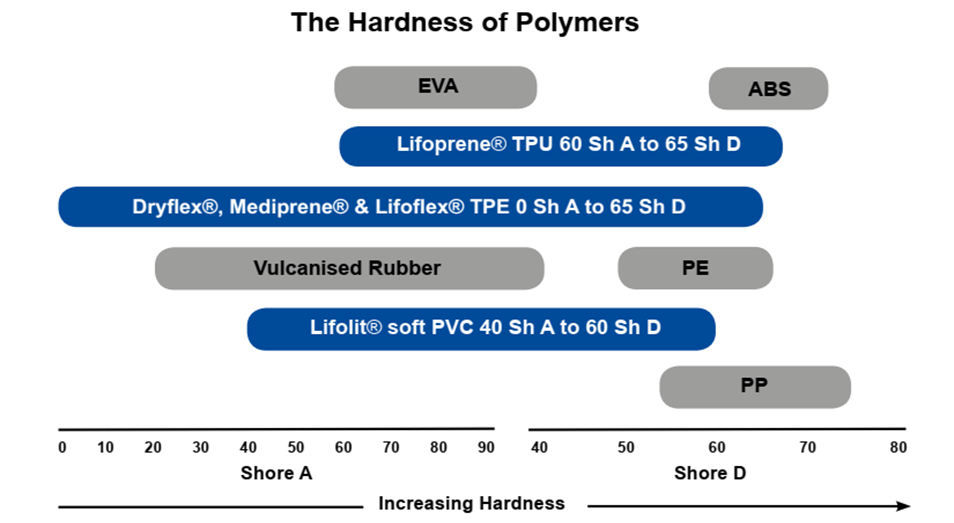 Fig 7. Hardness of several polymers
Table 3- amount of shore A and shore D for some products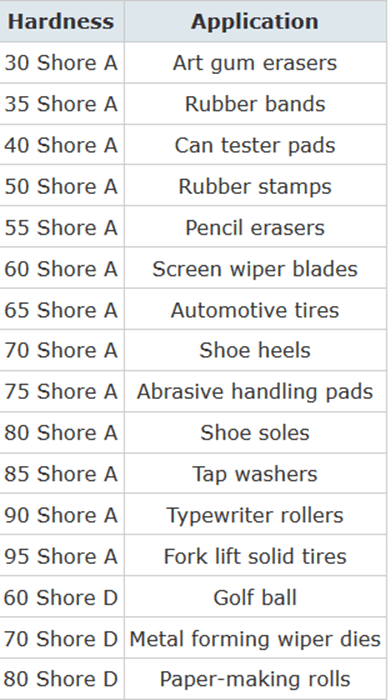
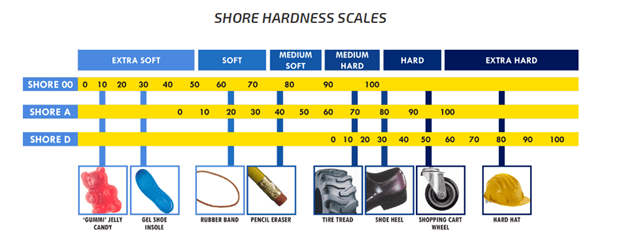 Fig 9. Shore hardness scales
Author: Emad Izadi Vasafi
References
[1] Wear of polymers – B. J. Briscoe, S. K. Sinha, 2002 – SAGE Journals
[2] R. Brown; “Handbook of polymer testing”, Rapra Technology, 2002
[3] Hardness Comparison of Polymer Specimens Produced with Different Processes” (2018)


